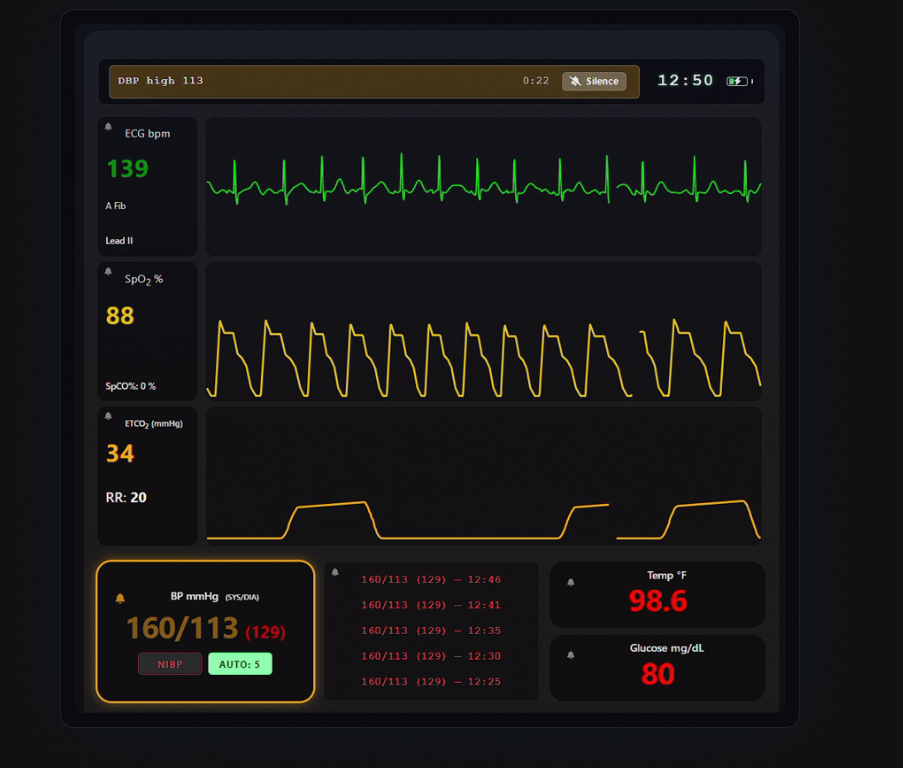
Most EMS classrooms rely on one shared monitor, static handouts, or verbal vitals from the instructor. A classroom vitals monitor changes this entirely, giving every student their own live screen showing real-time HR, BP, SpO₂, ECG rhythms, and EtCO₂ that the instructor controls from a single device.
Using a vital signs simulator in a classroom setting is no longer limited to one screen at the front of the room. Modern browser-based tools now allow EMS instructors to push live patient data heart rate, blood pressure, SpO₂, ECG rhythms, and capnography to every student device simultaneously, in real time, from a single controller.
This changes how EMS training works at a fundamental level. Instead of students watching one shared screen from a distance, every learner sees the same patient vitals monitor on their own device, updated instantly as the instructor drives the scenario.
This guide covers why this approach works, how to set it up in any classroom, and what kinds of training scenarios it makes possible for EMS programs of any size or budget.
Why One Screen at the Front of the Room Is Not Enough
Traditional EMS simulation training has a visibility problem.
In a typical classroom scenario, one hardware monitor sits at the front or beside a manikin. Students at the back struggle to see the display. Students who are not actively running the scenario have nothing to react to.
The instructor calls out vitals verbally while managing the scenario, splitting attention at exactly the moment focus matters most.
A classroom vitals monitor that pushes live data to every screen solves this directly. Every student, whether they are running the scenario, acting as a bystander, or observing from a seat sees the same real-time patient vitals monitor display on their own device. Everyone is active.
What "Pushing Live Data to All Screens" Actually Means
One device, the instructor's phone or laptop, acts as the controller. Every other device in the room, student tablets, laptops, or phones acts as a display monitor. All devices connect through a shared session ID.
When the instructor changes a parameter on the controller dropping SpO₂ from 98% to 84%, triggering ventricular tachycardia on the cardiac rhythm simulator, or raising the heart rate from 72 to 140 every display in the room updates instantly.
Students see the change at the exact same moment. No lag. No verbal announcement from the instructor. Just a live ems training monitor behaving the way a real patient monitor would.
What Students See on Every Screen
| Parameter | Display Format | What It Tells the Student |
|---|---|---|
| Heart Rate (HR) | Live number + ECG waveform | Rate, rhythm, and regularity |
| Blood Pressure (BP) | Systolic / Diastolic in mmHg | Perfusion status, shock indicators |
| SpO₂ | Percentage + Pleth waveform | Oxygenation and probe reliability |
| Respiratory Rate (RR) | Breaths per minute | Early deterioration signal |
| EtCO₂ | Waveform + numeric value | Ventilation quality and perfusion |
| ECG Rhythm | Continuous waveform | Cardiac rhythm identification |
| Temperature | °C or °F | Infection, hypothermia, shock |
Every parameter updates in real time as the instructor adjusts the controller. The display mirrors the interface of a real hospital-grade patient vitals monitor, the same layout students will encounter in clinical placements and on the job.
5 Classroom Scenarios That Work Best With Multi-Screen Live Data
Scenario 1 — Silent Deterioration Drill
The instructor sets a patient at normal vitals and begins a slow, silent deterioration: heart rate climbing, BP dropping, SpO₂ beginning to fall.
Students must monitor their screens, recognize the trend, and verbally call out when they identify the clinical picture without being prompted by the instructor. This builds the habit of continuous monitoring rather than reactive assessment.
Learning objective: Vital signs trend recognition and early warning identification.
Scenario 2 — Rhythm Recognition Under Pressure
The instructor uses the cardiac rhythm simulator function to cycle through cardiac rhythms sinus tachycardia, atrial fibrillation, SVT, ventricular tachycardia without announcing what is changing. Students unfamiliar with these patterns can review how to read a vital signs monitor before the session.
Students must identify each rhythm on their individual screens and document their interpretation before the instructor reveals the answer.
Learning objective: ECG rhythm identification using an ecg simulator display identical to a real field monitor.
Scenario 3 — Shock Pattern Identification
The instructor sets up different shock profiles across multiple scenarios hypovolemic, distributive, cardiogenic, obstructive by adjusting HR, BP, SpO₂, and RR on the controller.
Students must identify which type of shock is present based on the combination of values on their screen and articulate the clinical reasoning behind their diagnosis.
Learning objective: Pattern recognition for the four shock types using a live ems training monitor display.
Scenario 4 — Intervention Response Training
A student performs a simulated intervention oxygen administration, IV fluid push, cardioversion. The instructor responds by updating the vital signs simulator in real time to reflect what would happen physiologically.
SpO₂ rises after airway management. Heart rate drops after synchronized cardioversion. BP improves after a fluid challenge. Every student in the room sees the parameters respond, not just the student running the scenario.
Learning objective: Connecting clinical interventions to monitor response, building procedural reasoning.
Scenario 5 — Whole-Class ACLS Scenario
The entire class participates simultaneously. The instructor runs a cardiac arrest scenario on the cardiac rhythm simulatorbeginning with a shockable rhythm, progressing through CPR cycles, rhythm checks, and medication administration.
Every student follows the scenario on their own screen. The instructor can assign roles team leader, compressor, airway, medication and update the monitor display to reflect the patient's response to each intervention in real time.
Learning objective: Team-based resuscitation with live monitor integration for the entire class, not just the students at the manikin.
How to Set Up a Classroom Vitals Monitor in 3 Steps
No IT department. No hardware purchase. No installation required. These steps refer to how TrainingMonitor.app works in a classroom setting.
Step 1 – Open the Display
Students open display monitor in their browser to join the session and view the live vitals monitor.
Step 2 – Connect the Controller
The instructor opens the tool to control vital signs and joins using the session ID or QR code.
Step 3 – Start the Scenario
The instructor adjusts vitals from the controller, and updates appear instantly on all connected student screens. One controller can manage unlimited displays, locally or remotely.
Why Real-Time Data Beats Static Handouts in EMS Training
Static scenario cards present vitals once. A live patient vitals monitor shows them changing in real time, helping students recognize patterns, understand clinical progression, and respond with greater urgency.
Research consistently shows simulation is more effective than static case review because it better reflects real clinical monitoring. TrainingMonitor.app brings this experience to any classroom by turning any browser into a live patient vitals monitor that updates instantly from the instructor's controls with no hardware or installation required.